

Setting up your sessions
Creating and duplicating seasons
Before you set up sessions, you'll need a season to put them in. Navigate to the season switcher and click Add season. Choose a year, then leave Copy structure from blank to start fresh, or pick any past season to copy its setup into the new year.
When duplicating, you choose exactly what carries over - camper groups, sessions, session groups, payment settings, forms, discounts, departments and roles, cabins, contract templates, lead capture forms, and your enrollment agreement. All dates shift forward automatically based on the year difference, and items like forms, contract templates, and enrollment agreements arrive as drafts so you can review before publishing.
Once your season is created, configure when enrollment opens. You can set a general opens at date and an optional enrollment closes at date. If you want to give returning families or special groups early access, enable priority enrollment and set a priority opens at date - families with a valid access code can register during the priority window before general enrollment begins. For more on access codes, see the priority access codes section below.
Only one season can be the default at a time. The default season is what admins will see by default. Switch your default from the season settings when you're ready to transition to the new year.
Managing your sessions
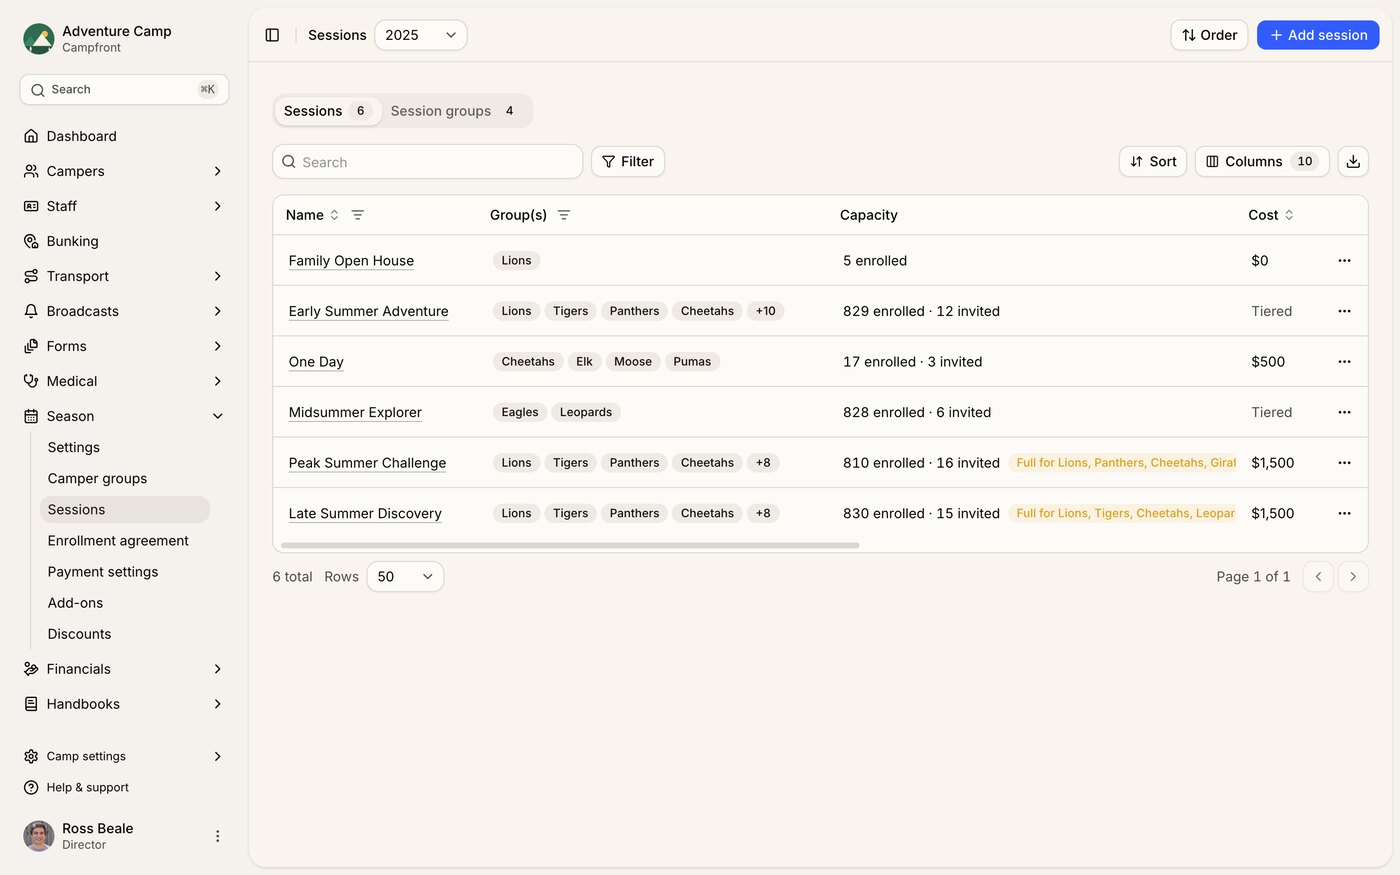
Navigate to Season > Sessions to see all sessions for the selected season. Use the season dropdown to switch between seasons.
The Sessions tab displays a table showing each session's name (click to edit), assigned camper groups, a capacity summary of how many campers are enrolled (with a Full badge once capacity is reached), the cost, start and end dates, whether it requires approval, whether it shows in the enrollment flow, who created it, and the date it was created.
Switch to the Session groups tab to see which sessions are bundled together into groups.
Session registration links
Each session has its own direct registration link. If you want to send families straight to a specific session rather than having them choose from their eligible list, you can grab the link from the sessions table.
To find a session's registration link, navigate to Season > Sessions. In the sessions table, locate the session you want, and the registration link is available to copy. Share the link however works best for your camp: in an email, on your website, or via a broadcast.
Families who open the link will be taken directly to registration for that session, skipping the session selection step entirely.
Creating a session
To create a new session, click Add session in the top-right corner of the Sessions page.
In the Create a session form, you can define:
Session name – A clear title for the session (for example, Early Summer Adventure).
Require approval – when enabled, enrollments into this session must be approved by an admin before being confirmed.
Show in enrollment flow – when enabled, this session will appear in the enrollment flow for families.
Start and end dates – The duration of the session.
Session price – The cost for that session.
Deposit – the amount collected at enrollment when a family chooses Deposit + balance or Installments, set as a percentage of the session price or a fixed amount. It's also the first installment payment, and an invitation or payment template can override it. Leave it at the default fixed $0 to require payment in full on those plans.
Tax rate – the sales tax percentage applied to this session.
Enable tiered pricing – allow families to choose from multiple pricing tiers during enrollment. When enabled, add tiers with a name, price, and optional limit on the number of spots available at that price.
Exclude from installment plans – when enabled, this session must be paid in full and cannot be split into installments.
Exclude from discounts – when enabled, automatic discounts will not apply to this session.
Additional questions – attach an existing form to collect additional information from families when this session is selected during enrollment.
Capacity per camper group
Set individual spot limits for each camper group within the session. Leave a group's capacity blank to make it unlimited - it's never treated as full, and it's left out of the total capacity shown on the form. The total capacity is calculated automatically from the combined capacities of the remaining (non-unlimited) groups. An explicit capacity of 0 is only rejected on a new overnight group, since that would create a group no one can enroll in - leave it blank instead.
Approval-required sessions
Toggle Require approval on any session or session group to add a review step before enrollment is confirmed. When enabled, families who select that session land in the Applied stage instead of moving straight to Enrolled. Your team can then review each application and approve or decline it from the enrollment profile.
This is useful for selective programs, audition-based sessions, or any situation where you want to vet applications before confirming spots. You can mix open and approval-required sessions within the same season - families will see a note during checkout explaining that their enrollment is pending review. For more on managing the approval workflow, see Managing enrollments.
Creating a session group
To create a new group, click Add session group on the Session groups tab.
Session groups are useful for families enrolling in multiple sessions at once (for example, First Half Summer or Full Summer Experience).
In the Create a session group form, you can:
Name the group (for example, Second Half Summer).
Add a Public description shown to families during enrollment.
Set a Cost for the whole group, or turn on Tiered pricing for multiple price points.
Set the group's Deposit as a percentage of the cost or a fixed amount, the same way as on a single session.
Toggle Require approval and Show in enrollment flow, the same as for a single session.
Exclude from installment plans or Exclude from discounts if the group needs its own rules.
Add sessions to the group - these are the sessions that make up the group.
Duplicating sessions and session groups
From the row action menu on the Sessions or Session groups table, choose Duplicate to create a copy with the same settings. This is a real time-saver when setting up similar sessions that share most of their configuration.
Exporting sessions or session groups
Click Export in the top-right corner of either table to download your session or session group lists. The export will include your current table view and any filters or sorting you’ve applied.